
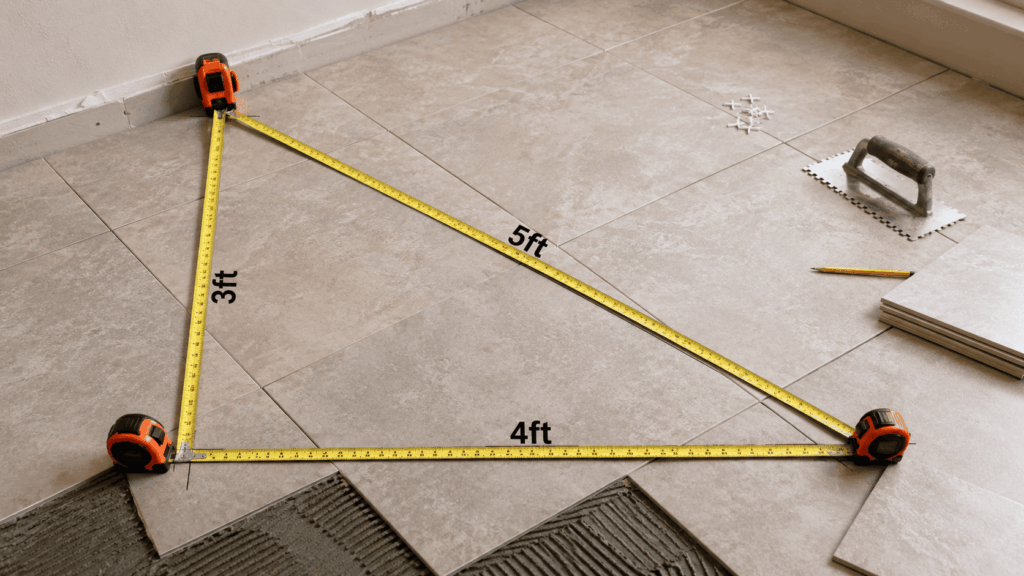
If you want straight and even tiles, you need a square layout before you start. What is the 3 4 5 rule for tiling? It is a simple measuring method that helps you create a perfect 90-degree angle. Measure 3 feet on one line, 4 feet on another, and the distance between those two points should be exactly 5 feet. If it is, your layout is square. Professional installers and DIY homeowners use this method to avoid uneven tile lines and costly mistakes. At Renzi’s Home Improvements, we recommend using this technique before laying any tile for accurate and professional-looking results.
Why the 3 4 5 Rule Matters
The What is the 3 4 5 rule for tiling is based on the Pythagorean theorem. It helps make sure your first tile is placed correctly because every row follows the first one.
Benefits include:
- Creates a perfect 90-degree corner
- Keeps tile lines straight
- Reduces cutting mistakes
- Prevents uneven grout lines
- Makes the finished floor look professional
Whether you are installing floor tiles, wall tiles, or outdoor pavers, this method gives you a strong starting point.
How the 3 4 5 Rule Works
The rule is very simple.
- Measure 3 feet from the corner along one line.
- Measure 4 feet along the second line.
- Measure the distance between those two marks.
- If the distance is exactly 5 feet, the corner is square.
You can also multiply the measurements for larger rooms.
| Layout Size | Measurements |
| Small Room | 3 ft × 4 ft × 5 ft |
| Medium Room | 6 ft × 8 ft × 10 ft |
| Large Room | 9 ft × 12 ft × 15 ft |
This method works because the measurements always create a perfect right angle.
Step-by-Step Tile Layout Guide
A good tile layout guide helps you avoid mistakes before the first tile is installed.
Step 1: Clean the Surface
Make sure the floor is clean, dry, and level.
Step 2: Find the Starting Point
Measure the room and mark the center or your preferred starting point.
Step 3: Use the 3 4 5 Rule
Apply the measurements to create square reference lines.
Step 4: Snap Chalk Lines
Use a chalk line to mark straight installation lines.
Step 5: Dry Lay the Tiles
Place a few tiles without adhesive to check spacing and cuts.
Step 6: Begin Installation
Once everything looks correct, start installing the tiles.
How to Square a Tile Layout
Many homeowners ask how to square a tile layout before installing new flooring.
Follow these simple tips:
- Measure carefully.
- Use a quality tape measure.
- Mark accurate reference points.
- Check measurements twice.
- Snap straight chalk lines.
- Confirm the 5-foot measurement before installing tiles.
Spending a few extra minutes on layout can save hours of fixing mistakes later.
Common Mistakes to Avoid
Even experienced installers can make layout mistakes.
Avoid these common problems:
- Starting without checking if the room is square
- Measuring from uneven walls
- Skipping the dry layout
- Ignoring small measurement errors
- Not checking lines again after marking
Small errors at the beginning become much larger across the entire floor.
Tools You Need
Here are the basic tools required for accurate tile layout.
| Tool | Purpose |
| Tape Measure | Measure distances |
| Chalk Line | Mark straight layout lines |
| Carpenter’s Square | Double-check corners |
| Pencil | Make layout marks |
| Level | Check floor flatness |
When Should You Use the 3 4 5 Rule?
The What is the 3 4 5 rule for tiling method is useful for almost every tile project, including:
- Bathroom floors
- Kitchen floors
- Shower walls
- Entryways
- Patios
- Garage floors
- Commercial tile installations
It works for both ceramic and porcelain tiles, as well as natural stone.
Advantages of Using the 3 4 5 Rule
Using this method offers several benefits.
| Without Proper Layout | With the 3 4 5 Rule |
| Crooked tile lines | Straight tile lines |
| Uneven grout joints | Consistent spacing |
| More tile waste | Less material waste |
| Difficult installation | Easier installation |
| Poor final appearance | Professional finish |
Tips for Better Tile Installation
For the best results:
- Measure twice before cutting.
- Use tile spacers.
- Check alignment often.
- Dry-fit tiles before applying adhesive.
- Use high-quality thin-set mortar.
- Clean excess adhesive as you work.
These simple practices help keep your tiled surfaces looking great while extending their lifespan.
Conclusion
Understanding What is the 3 4 5 rule for tiling one of the easiest ways to improve any tile installation project. This simple measuring method helps create square layouts, straight grout lines, and a professional-looking finish. Whether you are a DIY homeowner or an experienced installer, following this technique can save time, reduce mistakes, and improve the final result. By combining the 3 4 5 rule for tile layout, a proper tile layout guide, and knowing how to square a tile layout, you can complete your project with greater confidence and accuracy.
Frequently Asked Questions
What is the 3 4 5 rule for tiling?
It is a measuring method that creates a perfect 90-degree angle using 3, 4, and 5 units. This helps keep tile layouts straight and square.
Can I use meters instead of feet?
Yes. The rule works with any unit of measurement, including feet, inches, centimeters, or meters, as long as the ratio stays 3:4:5.
How do I square a tile layout in a large room?
Multiply the measurements. For example, use 6-8-10 or 9-12-15 to create larger square layout lines.
Is the 3 4 5 rule only for floor tiles?
No. It can also be used for wall tiles, backsplashes, patios, and many other tile installation projects.
Why is a tile layout guide important?
A proper tile layout guide helps reduce waste, improve alignment, and create a cleaner, more professional finish.